My Craft Diary is to record and comment on what I achieve in my crafting life. Please enjoy.
Sunday, July 10, 2022
Sunday, July 3, 2022
Sunday, June 26, 2022
Sunday, June 19, 2022
Monday, May 23, 2022
Home Schooling
I have had a lot going on in life and haven't been around for a while but things have settled now and I hope to be back regularly to annoy you with some creative inspiration.
But look out I'm back with a vengeance ...lol.
This month is all about going back to school, that time when we breathe a sign of relief ...argh....then run back to the craft room.
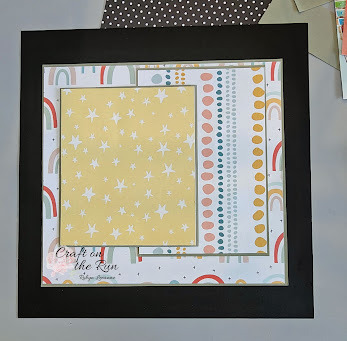
For back to school I have chosen to use Mintays "Childhood" collection. I have given instructions for this one and hope you will have a go at this layout and make it your own.
I hope you enjoy it.
Requirements:
6 x Coordinating Patterned papers.3 x Cardstock. (your choice of color for mats)
1 x Black Cardstock for Base.
Ephemera and Title of your choice.
We will start by doing all the cutting and matting that needs to be done.
Then placing each piece into position and sticking it down after that its just your decorating that needs to be done and add a title.
First pattern piece will be 9 3/4 x 9 inches.
Mat size is 10 x 9 1/4 inches.
Stick pattern paper to mat and put aside.
This will be referred to as P1 from now on.
Arrange on your Black cardstock.
P1 - 1 inch from left side and 1 1/2 Inches from the top.
Second pattern piece will be 5 1/4 x 7 1/2 inches.
Mat size is 5 1/2 x 7 3/4 inches.
Stick pattern paper to mat and put aside.
This will be referred to as P2 from now on.
Arrange on your Black cardstock.
P2 - 5 inch from left side and 1 3/4 Inches from the top.
Third pattern piece will be 5 1/2 x 6 1/2 inches.
Mat size is 5 3/4 x 6 3/4 inches.
Stick pattern paper to mat and put aside.
This will be referred to as P3 from now on.
Arrange on your Black cardstock.
P3 - 1 1/2 inch from left side and 2 1/2 Inches from the top.
2 x Fourth pattern pieces will be 4 1/2 x 1 3/4 inches.
Mat size is 4 3/4 x 2 inches.
Stick pattern paper to mat and put aside.
This will be referred to as P4 from now on.
Arrange on your Black cardstock.
P4a - 1/2 inch from left side and 3 Inches from the top.
P4b - 1/2 inch from right side and 3 Inches from the top.
2 x Fifth pattern pieces will be 6 x 1 inches.
No matting required for these ones.
This will be referred to as P5 from now on.
Arrange on your Black cardstock.
P5a - 3 inch from left side and 1 Inches from the top.
P5b - 3 inch from left side and 1 Inches from the bottom.
Photo Mat 1 - pattern piece will be 5 x 7 inches.
Mat 2 - size is 5 1/4 x 7 1/4 inches.
Stick pattern paper to mat and put aside.
This will be referred to as P6 from now on.
Arrange on your Black cardstock.
P6 - 3 inch from left side and 2 3/4 Inches from the top.
If you would like to distress or sand the edges or lift the pieces with foam tape go for it make it your own. Cannot wait to see your creations on our FB page.
Now you can decorate and add in your title, don't forget to do a little journaling these are big events in our kids lives.
Saturday, January 22, 2022
Cactus Canvas
Robyn Leeanne from Scraptease here today with a canvas for you.
I was trying to use the dew drops in a little different way this time.
Using metallic pens I colored the pictured.
Then using a fine tip pen I outlined the picture again.
Laid out the dew drops in the chosen colors to get an idea of what it looked like.
Glue down the pretty dew drops and used the metallic pens for the background. These pens are quite wet and you can manipulate the color well with water.
Added some words and a cows head and done. Hope you like it.
Thank you so much for stopping by.
I do hope you find inspiration in your day to craft.
Until next time my friends CRAFT ON!!
Please make sure to stop by my socials for more inspiration.
Saturday, January 8, 2022
Ocean Cards
Robyn Leeanne here from Scraptease again with another card embellished with the wonderful little Dew Drops.
Using leftover fussy cuts from the Stamperia Sea Creatures collection I created this card.
Once the fussy cutting had been added it was really just a matter of adding the pretty little Dew drops.
I hope you are inspired to grab some dew drops and get creating.
Thank you so much for stopping by.
I do hope you find inspiration in your day to craft.
Until next time my friends CRAFT ON!!
Please make sure to stop by my socials for more inspiration.
Subscribe to:
Posts (Atom)


